PRINTABLE CROCHET PATTERN · HALLOWEEN AMIGURUMI
Easy Crochet Witch Doll: Original Mini Pattern & PDF
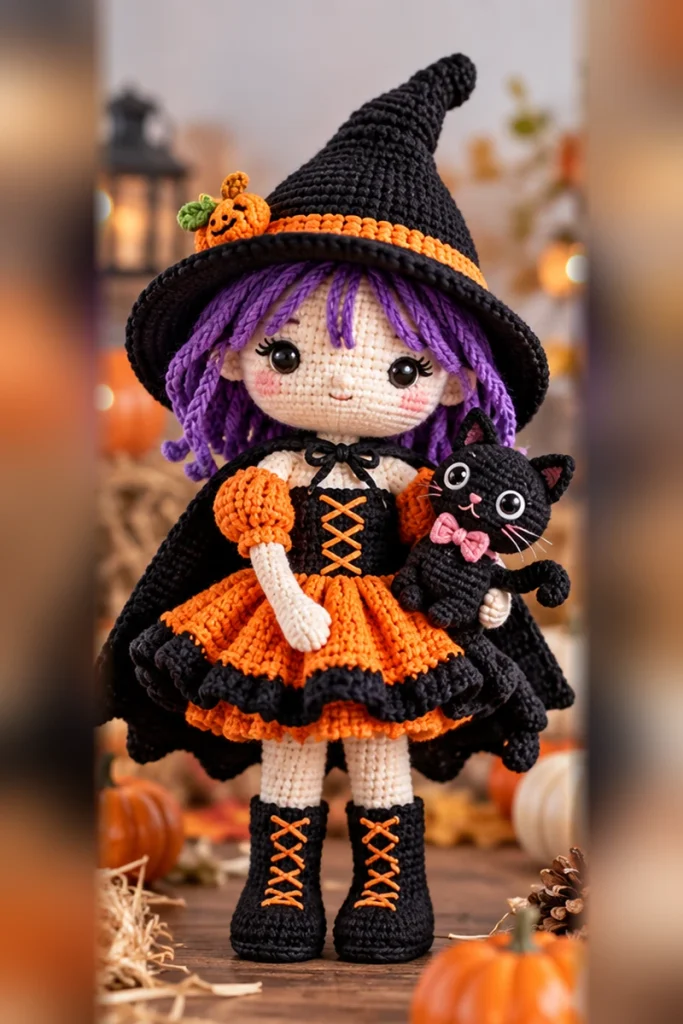
Build your own tiny Halloween witch doll with a simple dress-shaped body, round head, two little arms and a pointed hat. This accessible original practice design is intentionally much simpler than an elaborate multi-piece collector doll.
Skill level: Intermediate beginner (several small pieces)
Terminology: US crochet terms
Pattern format: Written rounds + printable PDF
A Tiny Witch for Halloween
Make a simple stuffed witch doll with a little dress, arms and pointed hat.
On this page: Supplies · Finished size and stitch key · Step-by-step rounds · Assembly and finishing · Common questions · PDF download.
About This Crochet Pattern
This beginner-friendly witch is designed as a compact decorative figure rather than a complex poseable doll. A cone-shaped dress gives it a stable silhouette, and a round head creates space for stitched eyes, cheeks and a small fringe.
Some Halloween inspiration photos include elaborate hair, layered skirts, wings, a black cat and other extras. Those advanced elements are not part of this simplified pattern. The sections below form a complete standalone mini witch figure with a pointed hat and a simple dress.
Project at a Glance
| Pattern detail | What to know |
|---|---|
| Project | Small decorative witch with dress body, head, arms and pointed hat |
| Difficulty | Intermediate beginner: rounds, color changes, assembly |
| Construction | Crocheted body, head, arms and hat sewn together |
| Finished size | Depends on yarn and tension; sample before promising a measurement |
| Included extras | Optional embroidered hair, contrast hem and hat band |
Materials and Tools
Choose coordinated colors for a distinctive Halloween look. The design works best when all main components use yarn of a similar weight.
- Skin-tone or pale cream yarn for the head and hands
- Purple, rust or orange yarn for the dress and sleeves
- Black or charcoal yarn for the pointed hat
- Small amount of brown, orange or purple yarn for hair and decorations
- A firm amigurumi hook that suits your yarn (for example, 3.0–3.5 mm with many DK yarns)
- Polyester stuffing, stitch marker, scissors and tapestry needle
- Black and pink embroidery yarn for facial details; optional contrast yarn for a hem
Yarn and hook tip: Start with a hook that produces a fabric tight enough to hide the stuffing, but do not pull the stitches so tight that your hands become uncomfortable. Your finished size will vary with yarn and tension.
Stitches and Abbreviations (US)
| Short form | Meaning |
|---|---|
| MR | Magic ring |
| sc | Single crochet |
| inc | Increase: 2 sc in one stitch |
| dec | Invisible decrease, or sc2tog |
| sl st | Slip stitch |
| ch | Chain |
| hdc | Half double crochet |
| FLO / BLO | Front loops only / back loops only |
Unless noted otherwise, crochet in a continuous spiral and move your stitch marker up at the start of each round. The number in parentheses shows the total stitch count after that round.
Full Written Mini Crochet Witch Doll Pattern
This is an original simplified decorative witch doll. Make the dress-shaped body first, then the head, two arms and hat. Use the same yarn weight for every part and adjust placement with pins before sewing.
Part 1 — Dress-Shaped Body
Use your main dress color. Work from the base upward in a spiral. Round 7 uses back loops so you can add a decorative hem to the unused front loops later.
| Round | Instructions | Sts |
|---|---|---|
| 1 | 6 sc in MR | 6 |
| 2 | Inc × 6 | 12 |
| 3 | (1 sc, inc) × 6 | 18 |
| 4 | (2 sc, inc) × 6 | 24 |
| 5 | (3 sc, inc) × 6 | 30 |
| 6 | (4 sc, inc) × 6 | 36 |
| 7 | BLO: sc around | 36 |
| 8–10 | Sc around for 3 rounds | 36 |
| 11 | (4 sc, dec) × 6 | 30 |
| 12 | Sc around | 30 |
| 13 | (3 sc, dec) × 6 | 24 |
| 14 | Sc around | 24 |
| 15 | (2 sc, dec) × 6 | 18 |
| 16 | Sc around | 18 |
| 17 | (1 sc, dec) × 6 | 12 |
| 18 | Sc around; stuff, then fasten off with a long sewing tail | 12 |
The dress bottom is already closed because you began at the base. Stuff the tapered body so it keeps a neat cone shape. Leave the neck opening at 12 stitches for sewing to the head.
Part 2 — Round Head
Use skin-colored yarn, working in a continuous spiral.
| Round | Instructions | Sts |
|---|---|---|
| 1 | 6 sc in MR | 6 |
| 2 | Inc × 6 | 12 |
| 3 | (1 sc, inc) × 6 | 18 |
| 4 | (2 sc, inc) × 6 | 24 |
| 5 | (3 sc, inc) × 6 | 30 |
| 6 | (4 sc, inc) × 6 | 36 |
| 7–12 | Sc around for 6 rounds | 36 |
| 13 | (4 sc, dec) × 6 | 30 |
| 14 | (3 sc, dec) × 6 | 24 |
| 15 | (2 sc, dec) × 6 | 18 |
| 16 | (1 sc, dec) × 6; start stuffing | 12 |
| 17 | Dec × 6; close opening with a yarn needle | 6 |
Before closing the head, embroider a small smile and eyes on the front. Shape the stuffing into a rounded ball. Position the head so the lower center sits over the narrow top of the dress.
Part 3 — Two Tiny Arms
Make two. Use skin-tone yarn for hands and switch to your dress color for the sleeves.
| Round | Instructions | Sts |
|---|---|---|
| 1 | 6 sc in MR using skin-tone yarn | 6 |
| 2–4 | Sc around for 3 rounds | 6 |
| 5 | Change to dress color; sc around | 6 |
| 6–8 | Sc around for 3 rounds; leave a sewing tail | 6 |
You can leave the arms unstuffed or add a very small amount to the hands only. Flatten each open end and sew to the upper sides of the dress just below the head.
Part 4 — Pointed Witch Hat
Use black or charcoal yarn. Increase gradually so the cone forms a pointed top; the brim is worked in the front loops of Round 27.
| Round | Instructions | Sts |
|---|---|---|
| 1 | 4 sc in MR | 4 |
| 2–3 | Sc around for 2 rounds | 4 |
| 4 | (1 sc, inc) × 2 | 6 |
| 5–6 | Sc around for 2 rounds | 6 |
| 7 | (2 sc, inc) × 2 | 8 |
| 8–9 | Sc around for 2 rounds | 8 |
| 10 | (3 sc, inc) × 2 | 10 |
| 11–12 | Sc around for 2 rounds | 10 |
| 13 | (4 sc, inc) × 2 | 12 |
| 14 | Sc around | 12 |
| 15 | (2 sc, inc) × 4 | 16 |
| 16 | Sc around | 16 |
| 17 | (3 sc, inc) × 4 | 20 |
| 18 | Sc around | 20 |
| 19 | (4 sc, inc) × 4 | 24 |
| 20 | Sc around | 24 |
| 21 | (5 sc, inc) × 4 | 28 |
| 22 | Sc around | 28 |
| 23 | (6 sc, inc) × 4 | 32 |
| 24 | Sc around | 32 |
| 25 | (7 sc, inc) × 4 | 36 |
| 26 | Sc around | 36 |
| 27 | FLO: (1 sc, inc) × 18 to start the brim | 54 |
| 28 | Sc around; fasten off and weave in ends | 54 |
Try the hat over the doll head before sewing. The point can bend slightly to one side; pin the brim in place while you choose its final position.
Part 5 — Optional Dress Hem and Hat Band
- Dress hem: attach a contrast yarn to one of the unused front loops from Body Round 7. Work 2 hdc into each of the 36 loops (72 hdc total), join with a slip stitch and fasten off.
- Hat band: chain a short contrast strip that fits around the widest part of the cone just above the brim. Sew it in place without pulling the hat out of shape.
- Hair: before sewing the hat down, use a yarn needle to add several short yarn strands across the forehead or sides; secure every strand on the inside of the hat or head.
Assembly and Finishing Tips
- Sew the stuffed head to the narrow top of the dress with several small, secure stitches.
- Pin both arms at the shoulder area, compare their height and sew in place.
- Embroider the face and add a few short yarn-hair strands if desired.
- Place the pointed hat over the crown, adjust the brim and stitch it securely to the head.
- Hide all ends, tidy the hem and check that the completed doll sits upright.
Keep the first doll simple. The hat, head and dress give the figure its recognizable silhouette. Add hair, a hat band or tiny patches only once the structure looks balanced.
Troubleshooting and Customization
The dress leans to one side.
Make sure the base rounds are evenly stuffed and the head is centered over the upper opening. Shift the head before tightening the final stitches.
My hat is too large or too small.
Yarn weight and stitch tension change the circumference. Try the hat against the head before finishing the brim; you may need to adjust hook size or one increase round.
Can I add a black cat, wings or boots?
Yes, but those are separate projects and not included in this mini pattern. Start with a stable basic doll and add only accessories you design or have permission to use.
Frequently Asked Questions
Does this pattern include the bat wings and black cat?
No. This simplified mini witch includes a head, dress, arms and pointed hat. Wings, cats and other accessories are separate optional projects.
Is the hat removable?
It can be left removable if it fits snugly and the doll is for display. For a sturdier keepsake, sew the brim in place.
Can I choose which Halloween PDF to sell later?
Yes. Once you have created an original, tested and photographed pattern, you can make a WooCommerce downloadable product and link your blog to that product.
Where is the witch doll printable PDF?
Use the Download Free PDF button at the bottom of this page for the printable mini witch instructions.
Explore More Halloween Crochet Patterns
🎃 Mini Pumpkin Crochet PDF Pattern → — A tiny fall decoration with a classic squash shape.
👻 Cute Ghost Crochet PDF Pattern → — Create a smiling ghost with a floating, wavy edge.
Want yarn tips and more project ideas? Read the companion Halloween crochet blog tutorial for this design.
Download Your Printable Crochet PDF
Save a printable copy of this mini witch doll pattern to follow the instructions whenever you have time for a little Halloween crafting.
Companion article: Crochet Witch Doll Ideas + Free Mini Witch Hat Pattern →