
PRINTABLE CROCHET PATTERN · HALLOWEEN AMIGURUMI
Mini Pumpkin Amigurumi: Free Crochet Pattern & PDF
Make a rounded mini pumpkin with beginner-friendly single crochet, then give it character with softly pulled ridges. This page is the dedicated pattern guide for the project featured in our Halloween pumpkin blog post.
Skill level: Adventurous beginner
Terminology: US crochet terms
Pattern format: Written rounds + printable PDF
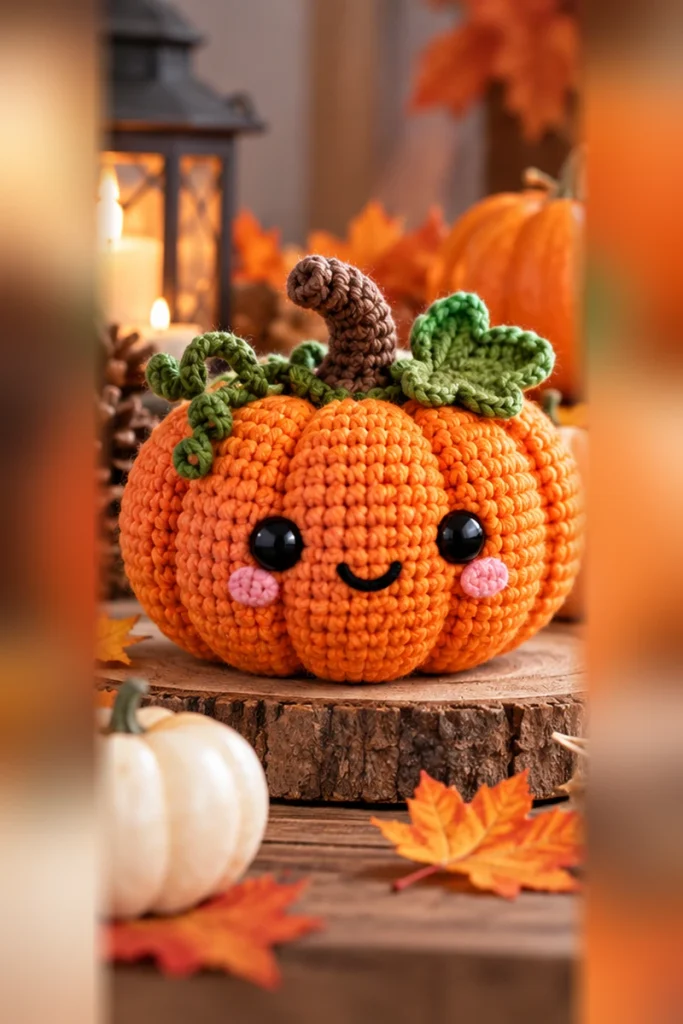
A Little Pumpkin to Keep
Build a soft orange pumpkin, shape its ridges and add your own stem.
On this page: Supplies · Finished size and stitch key · Step-by-step rounds · Assembly and finishing · Common questions · PDF download.
About This Crochet Pattern
This mini pumpkin starts as a simple sphere. Once you add a few long yarn passes from top to bottom, the smooth shape becomes a recognizable pumpkin with gentle segments. It is a satisfying way to practice increases, decreases and tidy finishing.
Use burnt orange for a traditional autumn look, cream for a neutral shelf accent, or deep rust for a moody Halloween palette. The optional embroidered face is best added before the final stuffing and closure.
Project at a Glance
| Pattern detail | What to know |
|---|---|
| Project | Stuffed mini crochet pumpkin with a stitched stem |
| Difficulty | Adventurous beginner: MR, sc, inc, dec and sewing |
| Construction | One continuous-round body, a flat stem and shaped ridges |
| Finished size | Varies by yarn, hook and tension; work a sample before making multiples |
| Printable guide | Keep a digital PDF copy of the pattern for offline crafting |
Materials and Tools
Small yarn leftovers are usually enough for a mini version, although actual yardage depends on the yarn weight and how firmly you crochet.
- Orange or pumpkin-colored yarn
- A small amount of brown or green yarn for the stem
- Crochet hook suited to firm amigurumi stitches (for example, 3.0–3.5 mm with many DK or light worsted yarns)
- Polyester stuffing, a yarn needle and scissors
- Stitch marker and a second piece of matching yarn for shaping the ridges
- Optional embroidery yarn for a happy face
Yarn and hook tip: Start with a hook that produces a fabric tight enough to hide the stuffing, but do not pull the stitches so tight that your hands become uncomfortable. Your finished size will vary with yarn and tension.
Stitches and Abbreviations (US)
| Short form | Meaning |
|---|---|
| MR | Magic ring |
| sc | Single crochet |
| inc | Increase: 2 sc in one stitch |
| dec | Invisible decrease, or sc2tog |
| sl st | Slip stitch |
| st(s) | Stitch(es) |
Unless noted otherwise, crochet in a continuous spiral and move your stitch marker up at the start of each round. The number in parentheses shows the total stitch count after that round.
Full Written Mini Pumpkin Crochet Pattern
Read all finishing instructions before starting so you can leave the correct length of yarn for shaping the mini pumpkin.
Part 1 — Pumpkin Body
Use orange yarn. Do not join rounds; put a marker in the first stitch of each new round.
| Round | Instructions | Sts |
|---|---|---|
| 1 | 6 sc in MR | 6 |
| 2 | Inc in each stitch | 12 |
| 3 | (1 sc, inc) × 6 | 18 |
| 4 | (2 sc, inc) × 6 | 24 |
| 5 | (3 sc, inc) × 6 | 30 |
| 6–11 | Sc in each stitch around for 6 rounds | 30 |
| 12 | (3 sc, dec) × 6 | 24 |
| 13 | (2 sc, dec) × 6 | 18 |
| 14 | (1 sc, dec) × 6; begin stuffing firmly but gently | 12 |
| 15 | Dec × 6; finish stuffing and fasten off with a long tail | 6 |
Thread the long tail through the front loops of the six remaining stitches and pull the opening closed. Weave through the center without cutting the tail yet if you want to use it to create the pumpkin ridges.
Part 2 — Make the Curved Pumpkin Ridges
- With a yarn needle, bring the long orange yarn tail from the closed bottom center through the stuffed body and out of the top center.
- Run the yarn down the outside of the pumpkin to the bottom center. Pull just firmly enough to make one shallow groove.
- Bring the yarn up through the center again and repeat around the pumpkin, spacing the grooves evenly. Aim for five or six segments.
- Once the shape looks balanced, secure the tail inside the pumpkin. If the body becomes too pinched, loosen the last pass and reshape the stuffing.
Part 3 — Simple Brown or Green Stem
Make a tiny flat strip that you can roll or fold into a short stem.
| Round | Instructions | Sts |
|---|---|---|
| Foundation | Ch 6 | 6 ch |
| Row 1 | Sc in 2nd ch from hook and across; fasten off with a sewing tail | 5 |
Roll or fold the strip loosely so the stem stands up. Sew its base to the top center of the pumpkin. A tiny green leaf can be made separately with a few chains and slip stitches if you want extra decoration.
Optional — Embroidered Pumpkin Face
- Before final closure, plan the placement of two small eyes on the widest part of the body.
- Use dark embroidery yarn to sew two short eyes and a curved smile, or keep the pumpkin faceless for a rustic look.
- Secure all ends securely inside the stuffing. Embroidery is often preferable to plastic safety eyes for projects intended for small children.
Assembly and Finishing Tips
- Check that the ridges are distributed evenly and the stem sits in the center.
- Use the yarn needle to hide every loose end inside the pumpkin.
- Gently squeeze the pumpkin into a slightly squat shape.
- If the item is made for young children, avoid detachable embellishments and confirm that the seams are secure.
Shape first, accessorize second. Work the segments gently and take a moment to compare the silhouette from every side before adding the stem or decorative embroidery.
Troubleshooting and Customization
Why is my pumpkin too round?
The ridges create most of the recognizable pumpkin character. Add one or two evenly spaced shaping passes rather than pulling a single groove extremely tight.
Why can I see the filling?
Try a slightly smaller hook or a firmer stitch tension. If you already finished, redistribute the stuffing away from areas with large gaps.
Can I make a larger pumpkin?
Yes. A thicker yarn and matching hook are the simplest options. If you change stitch counts, make sure increases and decreases remain symmetrical; you may also need more rounds for height.
Frequently Asked Questions
Is this pumpkin crochet pattern beginner-friendly?
It is suitable once you are comfortable making a magic ring, increases, decreases and continuous single crochet rounds.
How do I keep the pumpkin from looking like a ball?
The outside shaping passes create the segments. Evenly space the ridges and slightly flatten the stuffed body with your hands.
Can I use velvet or chenille yarn?
You can, but stitch visibility, finished size and yarn needs will change. Test the first few rounds with your chosen yarn.
Where is the printable PDF?
Use the Download Free PDF button near the bottom of this page to save the printable instructions.
Explore More Halloween Crochet Patterns
👻 Cute Ghost Crochet PDF Pattern → — Create a smiling ghost with a floating, wavy edge.
🧙♀️ Crochet Witch Doll PDF Pattern → — A small witch figure with a pointed hat and simple accessories.
Want yarn tips and more project ideas? Read the companion Halloween crochet blog tutorial for this design.
Download Your Printable Crochet PDF
Prefer to crochet away from your screen? Download the mini pumpkin instructions and keep them with your project notes.
Mini Pumpkin Amigurumi — Printable PDF
Keep a copy of the instructions handy for your next quiet crochet session. Download the PDF using the button below.
Need the instructions now? The full written practice pattern is available above. No email address is required.
Companion article: Halloween Pumpkin Crochet Pattern: Make a Cute Mini Pumpkin →